The next step after installing erwin Mart Portal is to configure using either of the two ways:
-
via command line interface (CLI)
Configuration via CLI is available erwin Mart Portal 12.5.2 onwards.
To use the same database that you have used for the r9.0.0 Mart (or any earlier release of r9 series Mart), upgrade your mart. Refer to the Upgrading Mart topic before proceeding.
To configure erwin Mart Portal, follow these steps:
-
On the Windows Start menu, click erwin > Configure Mart Portal.
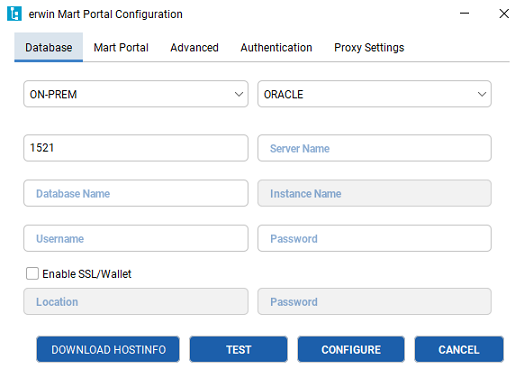
- Configure database settings.
- Configure mart portal settings.
- Configure advanced settings.
- Configure authentication settings.
- Configure proxy settings (only applicable to erwin ER360).
- Click Test to validate the configuration.
- On successful validation, click Configure.
Configuring Database Settings
On the Database tab, configure the following settings:
| Field | Description | Additional Information |
|---|---|---|
| Database Connection Method | Specifies whether the mart connects to an on-premise database or to a database via a JDBC connection string. | |
|
JDBC Connection String |
Specifies the JDBC connection string to connect to a database |
This option is available only when the Database Connection Type is set to Custom JDBC URL. |
| Database | Specifies the mart database provider |
Available options are:
|
| Port No | Specifies the port number of the database server | |
| Server Name | Specifies the name of the database server where you have installed the Mart database. For example, suppose that you are using SQL Server as the Mart database. Enter the name of the computer where SQL Server is installed. | |
| Database Name | Specifies the database to which the mart must connect |
If you are installing the Mart for the first time, use a new database. Do not use an existing database. If you are upgrading the Mart from any earlier release of r9 series to the latest release, use the corresponding Mart database. For an Oracle mart, ensure that appropriate permissions for a materialized view are assigned to the installer role (GRANT CREATE MATERIALIZED VIEW TO MMINSTALL;). For more information, refer to the Creating Oracle Database topic. |
| Instance Name | Specifies the name of the database instance | This option is enabled only when the Database is set to SQLServer. |
|
Username |
Specifies the user name to connect to the Mart database |
This username must be is authenticated by the Mart database. Windows authentication (User Name field) is not supported for connecting to the Mart database from the Configure Mart Portal window. Ensure that the user is server authenticated. |
| Password | Specifies the password to connect to the Mart database | |
| Enable SSL/Wallet |
Specifies whether SSL or Wallet (in case of Oracle database) is enabled |
|
| Location | Specifies the location of the wallet file | This option is enabled only when you select the Enable SSL/Wallet check box. |
| Password (For SSL/Wallet) | Specifies the password that you set for the wallet | This option is enabled only when you select the Enable SSL/Wallet check box. |
|
Download Hostinfo |
Downloads the host machine's information for erwin ER360 offline license. |
This feature downloads the following information in the JSON format.
The erwin licensing team uses this information to configure an offline license for erwin ER360. For more information on offline licenses, contact license support. |
Configuring erwin Mart Portal Settings
The Mart Portal tab specifies application settings.
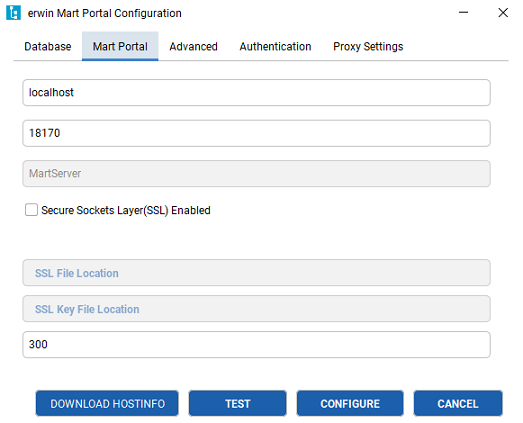
On the Mart Portal tab, configure the following settings:
|
Field |
Description |
Additional Information |
|---|---|---|
| Server Name |
Specifies the name of the computer where the Web Server is present. For example, if you are using Tomcat, enter the name of the computer where Tomcat is installed. Default: localhost |
|
| Port Number |
Specifies the port number on which the Web Server is running. |
You can now configure erwin Mart Portal on any port except 18172, 18174, and 18176 (These ports are used as proxy ports.). If you use SSO, ensure that you configure the correct port number here according to your SSO configuration. |
| Secure Sockets Layer (SSL) Enabled | Specifies whether you want to connect to the Mart through a secured connection (SSL) | Using a self-signed SSL certificate may result in an error about certificate authority while connecting to erwin Mart. In that case, click OK to continue connecting to erwin Mart |
| SSL Certificate | Specifies the location of SSL certificate file |
This option is enabled only when the Secure Sockets Layer (SSL) Enabled option is selected. The certificate is available at C:\Program Files\erwin\Mart Portal\Apache\myerwin.mart.crt. |
| SSL Key | Specifies the location of the SSL Key file |
This option is enabled only when the Secure Sockets Layer (SSL) Enabled option is selected. The key is available at C:\Program Files\erwin\Mart Portal\Apache\myerwin.mart.key. |
| Account Lockout Duration (in seconds) | Specifies the duration (in seconds) for which an account should be locked whenever an incorrect password is entered five consecutive times | By default, it is set to five minutes (300 seconds). At the most, you can set it to 30 days (2592000 seconds). |
Configuring Advanced Settings
The Advanced tab specifies mart upgrade settings.
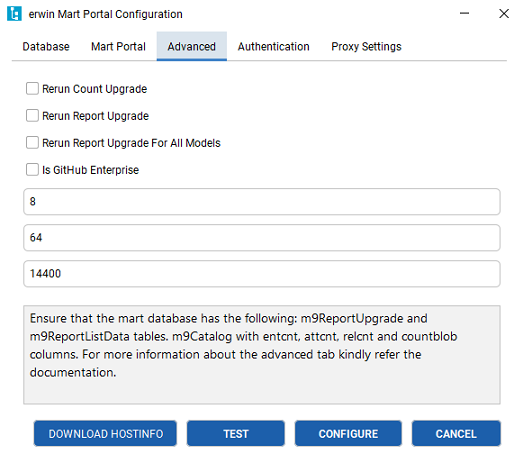
In case of failures in upgrade, before you rerun the upgrade, on the Advanced tab, configure the following settings:
|
Field |
Description |
Additional Information |
|---|---|---|
| Rerun Count Upgrade | Specifies that the model count upgrade should run while running the Mart database upgrade | |
| Rerun Report Upgrade | Specifies that the report upgrade should run while running the Mart database upgrade. | |
| Rerun Report Upgrade For All Models | Specifies that the report upgrade should run for all models while running the Mart database upgrade | |
|
Is GitHub Enterprise |
Specifies whether your GitHUb account is an enterprise account |
|
| Database Initial Size |
Specifies the initial mart database size in MB By default, this is set to 8 MB |
|
| Database Max Size |
Specifies the maximum size the mart database can take in MB By default, this is set to 64 MB |
|
| Rest API Token Lifetime(in seconds) |
Specifies the duration (in seconds) for which your REST API token will be valid By default, this is set to 14400 seconds (four hours) |
- m9reportUpgrade and m9ReportListData tables
- m9Catalog table with entcnt, attcnt, relcnt, and countblob columns
To upgrade, follow these steps:
Click Configure.
The Mart Portal Upgrade dialog box appears.

Click Yes.
The MartUpgrade screen for count upgrade appears.

Once the count upgrade process is complete, the ReportExport screen appears.
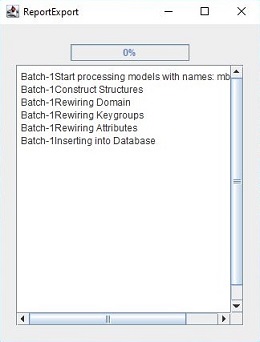
This screen does not appear when you upgrade from 2020 R1 Mart to higher versions.
On completion of report export process, the upgrade process is complete.
Configuring Authentication Settings
The Authentication tab specifies user account authentication settings. The available settings differ based on the selected authentication method.
The authentication methods and settings that you configure here are applicable to erwin ER360 as well.
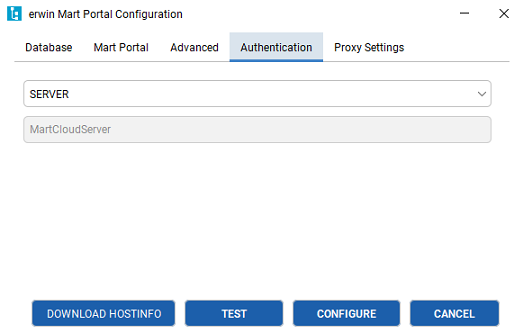
On the Authentication tab, configure the following settings:
|
Authentication Method |
Field |
Description |
Additional Information |
|---|---|---|---|
| Server | Specifies that authentication is server-based | ||
| Active Directory Details | Domain Controller Name |
Specifies the fully qualified name of the Active Directory Server (Domain Controller). Enter the name in the following format: LDAP://server/distinguished-name Example: ldap://mktgna:3268/dc=abc, dc=com |
Here, mktgna is the server name. You can provide either the name of the server or the IP address. 3268 is the port number to which the server listens. dc=abc, dc=com is the distinguished-name. The distinguished name is the full path of the object. If you do not know the Domain Controller Name, use the Nltest command or contact your System Administrator. |
|
Domain\Username |
Specifies the domain name and user name in the <domain name>/<user name> format | ||
| Domain Password | Specifies the password of the domain user | ||
| Azure AD (OAuth2) | Tenant Id | Specifies your Azure AD environment properties for connection
|
Configure these settings based on your provider and the protocol. For more information on configuring AzureAD OAuth on Microsoft , refer to the AzureAD OAuth topic.
|
| Graph Scope | |||
| Client Id | |||
| Client Uri | |||
|
Client Secret |
|||
|
SAML (SAML 2.0) |
Metadata XML method |
Specifies your SAML environment properties for connection |
erwin Mart Portal is certified for SAML with: You can also use any other SAML supported identity provider. To use any of these identity providers, ensure that you do the following: - On the Mart Portal tab, set up Secure Sockets Layer (SSL), SSL Certificate, and SSL Key. - On the Authentication tab, click Download SP Metadata and upload the metadata XML file to your provider's portal. Then, configure these settings based on your provider and the protocol. |
|
MetaData XML |
|||
|
Group Attribute Name |
|||
|
User Email Attribute Name |
|||
|
Download SP Metadata |
Downloads the service provider metadata file that is required for your SSO setup |
Based on your configuration here, the available options to add users in erwin Mart Portal change.
Configuring Proxy Settings
The Proxy Settings tab is applicable only to erwin ER360 and specifies proxy server settings.
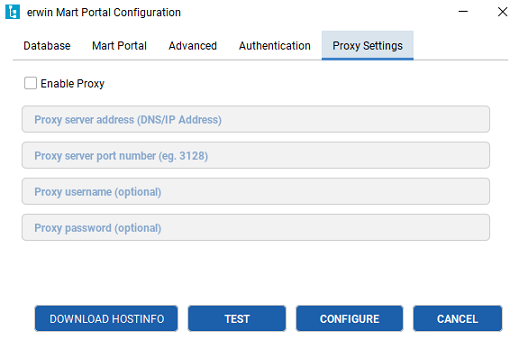
On the Proxy Settings tab, configure the following settings:
| Field | Description | Additional Information |
|---|---|---|
|
Enable Proxy |
Specifies that a proxy server should be used for erwin ER360configuration |
|
| Proxy server address (DNS/IP Address) | Specifies the proxy server's address, either DNS or an IP address | |
|
Proxy server port number |
Specifies the port number on the proxy server that you want to use |
|
| Proxy username | Specifies the proxy server credentials | |
| Port password |
To configure erwin Mart Portal via CLI, open command line interface and run following commands, for example, for PostgreSQL:
>cd C:\Program Files\erwin\Mart Portal\MartUpgrade
>SET PATH = %JRE_HOME%\bin
>java -jar ./MartConfiguration.jar configure
--conntype=ON-PREM
--dbname=test
--dbport=5432
--dbpwd=postgres
--dbserver=localhost
--dbssl=false
--dbtype=POSTGRESQL
--dbuser=postgres
--dbschemaname=public
--walletlocation=
--walletpwd=
--adminport=8081
--iisport=80
--locktime=300
--martappname=MartServer
--martserverhost=localhost
--martuseiis=false
--martusessl=true
--sslfilelocation="C:\Program Files\erwin\Mart Portal\Apache\myerwin.mart.crt"
--sslkeyfilelocation="C:\Program Files\erwin\Mart Portal\Apache\myerwin.mart.key"
--authorizationType=LDAP
--dcname="ldap://10.250.28.4:389/DC=quest,DC=com"
--domainuser=quest\sysadm
--domainpwd=Erwin12345
For example, to configure erwin Mart Portal with PostgreSQL database, follow these steps:
-
Open command line interface and navigate to C:\Program Files\erwin\Mart Portal\MartUpgrade.
-
Run the following command:
java -jar ./MartConfiguration.jar configure --conntype=ON-PREM --dbname=26feb --dbport=5432
--dbpwd=admin --dbschemaname=public --dbserver=localhost --dbssl=false
--dbtype=POSTGRESQL --dbuser=postgres --walletlocation= --walletpwd=
--adminport=8443 --iisport=80 --locktime=300 --martappname=MartServer
--martserverhost=localhost --martuseiis=false --martusessl=true
--sslfilelocation="C:\Program Files\erwin\Mart Portal\Apache\myerwin.mart.crt"
--sslkeyfilelocation="C:\Program Files\erwin\Mart Portal\Apache\myerwin.mart.key"
--authorizationType=SERVER
Once done, this configuration in updated in configuration file, MartConfiguration.properties, located at C:\ProgramData\erwin\Mart Portal. It is also available on the erwin Mart Portal Configuration screen.
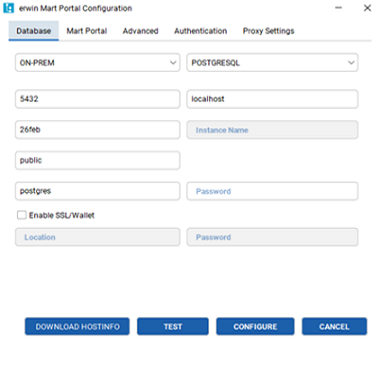
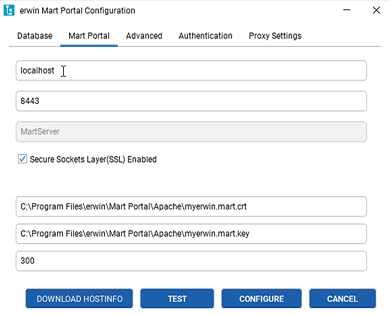
For the full list of commands, refer to the erwin Mart Portal Configuration- CLI Commands topic.
|
Copyright © 2025 Quest Software, Inc. |